Showing posts with label Spellbinders. Show all posts

Tuesday, June 14, 2011

Tiddly Inks Simplify, One Layer Card


Oh what a challenge from the Tiddly Inkers today! Simplify and make a one layer card. What? Eiyiyi! As you know clean and simple is hard enough for me, but ONE LAYER!? Fortunately I'd been blog hopping and came across a beautiful card that StampinAngelJenn had made for her hubby's birthday HERE. The sentiment just spoke to me so I "borrowed" it and used Love Hurts to create a one layer card. Jenn informed me that the sentiment is actually part of the gorgeous image she used by Michelle Perkett Studio. I sized and colored each heart individually on my Pagemaker Pro computer program, added the computer generated sentiment and used my Cuttlebug border to emboss above and below.


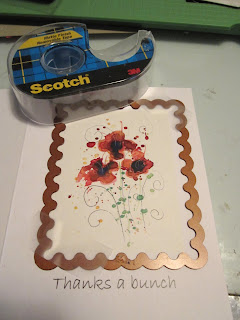
I also made some quick note cards using one of Christy's Colored Art images. Her beautiful Flower Blooms is perfect for any occasion and would make a lovely card gift set in the blink of an eye. The image has a soft yellow background so I sized it to fit the inside of a Nesties Classic Scalloped rectangle and I embossed the frame (instead of cut it) using my Grand Caliber. This would work with your Cuttlebug or Big Shot as well. I'm also entering this card in the Less is More One Layer Frame it Challenge.


Simply print your image and tape your Nestie to the card front using removeable tape.


Turn your card cut side up on the base plate, but instead of using the cutting plate, use the embossing mat and plate as your sandwich and run it through your machine.


Here's how it looks on the inside after I punched tiny holes and threaded Peapod twine from The Twinery through to dress up the front. Easy peasy! Christy has loads of fabulous colored images in the Colored Art Section of the SHOP that makes cardmaking a breeze! Christy also has a fabulous Freebie Template and tut on her blog HERE. There is some exciting news about the new shop with new features and for less than a day, today, there's a special freebie printable notecard set available when you register for the new shop so hurry! Be sure to visit Christy's Blog to find out the deets and exciting new coming attractions. Now check out the rest of the Tiddly Inkers inspirational one layer cards and we hope you decide to simplify with us this week.

Tuesday, April 12, 2011

Hip Hop Hooray!


I wanted to play more with some of my new crafty goodies and decded to use my Spellbinder Grands Creative book pages dies to make a shaped card. The mat is also cut with another of the dies in the from the DCWV Flower Shower Stack. Then I colored up the new Tiddly Inks BunnyQ and colored her with Copics. The cute sentiment comes with this digi stamp too. Now how to embellish? I still had twine left out and thought it might be fun to make some tassels. Then I used a teeny flower punch, punched each flower 6 times and secured them with a tiny brad and ruffled the petals, then added a punched butterfly and a few adhesive pearls and called it done. Don't forget that the referral challenge at The Tiddly Inks Challenge Blog is still running and you and a friend have a chance to win free images. See the details HERE. And because it's Tiddly Tuesday, there is a sneak peek of new images (with a new cute Minnie already available in the shop HERE) and a freebie sentiment I'm sure you'll want to grab HERE. We're gearing up for a Birthday Bash. WooHoo!!

I've popped the circle, image and sentiment. Not much dimension for me, but I'm hoping it's enough to enter in the Papertake Weekly Truly Dimensional challenge. And the colored image qualifies me to enter Guest Designer Tesa's Coloring Challenge on Yvonne's Blog, Do More With Less. Guess who might just be the Guest Designer Next Week? HeeHee!


Tuesday, March 29, 2011

The Cuttlebug Spot Oh So Soft Challenge


Were rounding up our month of embellie challenges at The Cuttlebug Spot. And I'm sad to say it's the last of our challenges for awhile. The Cuttlebug Spot will be taking a bit of a break but don't forget us, WE'LL BE BACK! Our final challenge is Oh so Soft featuring felt in our designs. I was particularly excited about this one because I'd been dying to try my MFT Die-namics dies with felt. I use the Rolled Flower and the Rolled Rose. They cut quite easily in the Cuttlebug, but in a few cases I did have to snip through a few reluctant stands of fiber. You use the same sandwich as with Nesties; A plate, C plate, die, felt, and B Plate. Then I rolled them up and glued them using Zip Dry glue to a small punched circle and added adhesive pearls to the centers. The leaves were from the Spellbinders Nested Leaves dies. Pretty pretty, huh? The background embossing is done with an old style Fiskars Basketweave Texture plate. I'd never had much luck with embossing with these, but while at the Scrap Expo I came across Lucy McGoo's Wonder Goo which, when sprayed on card stock is (among other things) supposed to enhance embossing. Still not as crisp as a folder, but a definite improvement. The eggs were cut with my Spellbinder's Nested Eggs dies, and embossed with my new Sizzix Country Foliage folder. The bottom scalloped border was not punched, but rather cut with the Scalloped Scallop Die-namics Die from MFT. "Happy Ester was computer generated on a little banner cut with my Stampin' Up Bigz Petal Cone Die (Thanks Lilllie!) I'll be using that whole die in the near future.


So, it's a simple Easter card, but ALL Cuttlebug. Here's a pic of all of the goodies I used. the Design Team has all sort of inspiration using felt, so be sure and check out The Cuttlebug Spot and please play along. Last chance for awhile. You might want to consider subscribing so as not to miss our return. Don't forget us!

Thursday, March 24, 2011

Tiddly Inks Picture Me Challenge


This week at the Tiddly Inks Challenge Blog we have a super challenge. Besides the gorgeous Photo Inspiration, you must combine it with a shaped card NOT using your Cricut. My initial reaction to this was "I'm glad I'm on Team B and not required to follow the challenge this week, LOL" but Lysa has done a fab tutorial and the photo is really beautiful so I thought "Hey, it's a CHALLENGE, get that butt in gear."


I've used Lysa's Style 1 using my Nesties Labels 10. The only difference is I cut an additional mat to glue on top to hide the fold. I pretty much do that with ALL of my shaped cards, including Cricut, because it gives me a sturdier base on which to pop my images. Next came another mat using DP from Me&My Big Ideas in the colors from the photo above. I chose Tiny Dancer for the image because her tutu reminded my of the flower puffs in the photo (and because it's one of my favorite songs). She's colored with Copics.
The sentiment is a REALLY old word stamp from a set called Rubber Stamp Poet by All Night Media. It's cut with the the smallest of the Mega Ovals large Nestie and matted with a Petite Scalloped Oval Large. Does anyone but me get confused by these names? the sentiment is popped with a 1/16" dot and Tiny Dancer with 1/8" dimensionals. for the flower, I layered pink and orange tulle and cut it with my Tim Holtz Tattered Florals die. These thick dies do work in the Cuttlebug by eliminating the A Plate and sandwiching the die and what ever you're cutting between 2 B Plates. The layers (6 in all) are secured with a sparkly Doodlebug brad. There's a little tulle bow at the top, and some amethyst adhesive jewels for embellies.


Come on, peeps, this is not that tough a challenge! There has been a change in the Tiddly Inks Challenge criteria requiring the use of TI images only, but there are FREEBIES to be had HERE, and if you don't have any Nesties, you can check out some of the there ways the DT has created shaped cards. Christy even has a freebie Template available on her BLOG, so there's just no excuse! Christy is also previewing the adorable new images available this week so what are you waiting for? I'm also entering this in the Simon Says Stamp Mother'sDay/ Girly Challenge. Don't think I could get much more girly than this! AND on the Simon Says Stamp and Show Blog the challenge is Show a WORD! Mine is obviously "Dance".


Tuesday, March 8, 2011

Oh So Charming at The Cuttlebug Spot


Continuing our month of embellies, The Cuttlebug Spot is featuring charms this week. I was really pretty excited about this one because I knew immediately what charm I wanted to use. I got these cherries in the clearance at M's awhile back for a buck and they had originally been $19.00. Apparently to go on a bracelet with a clip on clip so it's removable on my card. I figured I'd FINALLY get to use my Spellbinders Cherry Pickin Frame so I had that cut, embossed and colored with gel pens very early on. I'd just gotten new Cricut blades, too so I decided to cut the sentiment from Just Because Cards on my Cricut at 1 1/4", a size I wouldn't normally attempt for a delicate cut like this but it cut like butter and I was on a roll (or so I thought). I pretty much thought I was WAY ahead so I put my card aside to work on some of my other DT things and picked this back up yesterday figuring it would be a snap. Not so much!
Here's where things got tricky. You might want to pause here and get a cup of coffee or glass of wine, depending on what time of day it is in your neck of the woods because I'm gonna ramble again, or you can just skip it all, look at the pix (there are more than usual) and of course leave me a comment (hopefully) and go about your merry way. This card took FOREVER (all day and into the early evening, actually), even though I had all of the major stuff done. It's because I put so darn many self imposed rules and restrictions on my DT cards. I take my DT positions VERY seriously. I try to do each in a style that suits the particular challenge blog be it Cricut, or stamping, or vintage, or macabre or CUTTLEBUG, so you're not gonna see a Cricut card or stamped card with a teeny bit of embossing thrown in as an afterthought because I really want to showcase the Cuttlebug and perhaps show you a different technique, new goody or whatever. Now that's just me. Basically, the challenges are good as long as you use your Cuttlebug somewhere, but I challenge MYSELF with this (and hopefully encourage you to explore your Cuttlebug capabilities a bit more in the process). So I didn't just want to slap this stuff on a card and call it done. I wanted to incorporate more folders, a new card fold, you know, something different but was stumped.

I wanted to use, in particular, a folder from the Cuttlebug Preserves Cricut Companion set because it had cherries on it and also something that looked like a basket (finally decided on the Sizzix Plaid folder from one of their Basic Grey Christmas sets, both on SALE at Custom Crops) but that cherry frame was pretty BIG. I got it in my mind to do one of those sort of petal cards (a square in the middle with half circles at each side that fold up sequentially). Not really sure if I explained that right, but I did designed and cut one on my Cricut and embossed every other one with the 2 folders I mentioned but them couldn't decide what to do with the frame. Put it inside? Obviously this was a no go, because I ended up cutting off 2 of the flaps that WERE embossed with the Preserves folder to stick on version 2 and this is what was left. Hopefully I can use it for something else in the near future.

So on to a regular gate fold card but the thing wouldn't stay closed so I made a band and stuck the frame on that and took this pic but I didn't like this either. the band hid too much of the embossing and was a pain to slide off so I tried again...
ripped the ribbon off, taped it to card stock the same width and attached the frame again. Better, but with the band off the card was so darn plain... so I abandoned the band idea completely. (I do love that cherry ribbon though)
Ripping that frame was pretty difficult but I managed so here's how the final version opens. The colored part of the frame is popped on one side of the gate fold (reinforced with a second frame glued to the back for strength) the the sentiment side is attached directly to the other. Conveniently, when the 2 sides intertwine, the card stays closed. WooHoo! So you see, many times my designs turn out nothing like I originally planned, often take 5 times longer than anticipated, and drive me to drink at the end of the day. I wonder if any of you STILL want to get inside my head while I'm crafting. Bet not. LOL Now go have a peek at my my fabulous teamies have done with this challenge and why not try a hand at it yourself?

Tuesday, March 1, 2011

The Cuttlebug Spot Hat Pins Challenge


This month The Cuttlebug Spot is all about embellishments and our first week features hat or corsage pins. Some of us (like me) used manufactured pins (my little hearts are from Maya Road) while others made gorgeous ones using beads and pearls. Our own Theresa has a wonderful video on making your own right on The Cuttlebug Spot this week. My card is a sort of "Welcome Spring" card using the pyramage technique. I originally saw this technique on Sherry Cheever's Blog and she has a video HERE. The image was a freebie from ? and I used my Nesties Lables Nine for the layers. The embossed frame is from the Heritage Cuttlebug Companion set . The pretty velvet leaves are from 7 Gypsies.
I inked the frame to bring out the embossing a bit and popped it. Usually when I cut a frame in a mat I use a larger Nestie so the underlying mat shows around the image, but I'd used all 5 of the Nesties in the set for my image so I had nothing larger. I still like the fact that it is slighty recessed, though. The rest of the team has done a fabulous job with the challenge so stop by the Cuttlebug Spot and we invite you to play along for a chance to win a $ 20.00 gift certificate from Custom Crops. But remember, although the challenge is about embellishments, we still expect you to use your Cuttlebug or similar machine somewhere on your card.

Tiddly Inks Color Me Challenge


It's Tuesday, and time for another fun challenge sure to brighten your day at the Tiddly Inks Challenge Blog. We Tiddly Inkers are banishing the winter blahs with a serious dose of color! Our Color Me Challenge encourages you to use as many colors as possible and the Sassafras rainbow paper was perfect to pair with Catch My Heart. She's colored with Copics and cut out with a Labels Nine Nestie. The sun peeking out behind her are Nesties Pinking Circles and the checkered scalloped border are from the same Sassafras DP. The sentiment is computer generated and cut with a Nesties Deckle Rectangle. Doesn't all this glorious color chase your blues away? For more inspiration be sure to check out the gorgeous projects by my DT sisters and come join us in this super fun challenge.

Tuesday, February 15, 2011

The Cuttlebug Spot Opens the Gates


Our challenges all month at The Cuttlebug Spot are highlighting unique card folds and this week we're opening the gates with gate fold cards. I wanted to try something a bit different by making my gate fold card look like a gate so I used my Spellbinders lattice border (the one that cuts on only one side) to cut and emboss the top of the gate as well as the front pieces that open. I started with a piece of white card stock that was 6x11" and scored it to make a gatefold. Then I cut down the scores to where I wanted the top of the front of the card to end and then cut it across. Then I used the border along the top back and turned the card over and aligned the die at the fold of each side and ran it through the Cuttlebug again. (Again, hope this makes sense. I haven't really had time to do a tutorial, sorry) Then I cut blue mats and white mats which I embossed. The front panels are embossed with Swiss Dots, and the inner panels with Formal Squares.
The top of the inside mat is embossed with the Cuttlebug border folder from the Organic Flourish set. I scored a line and then embossed the remainder with Swiss Dots. The ribbon which is woven through the lattice on the front and holds the card closed is captured by the inside mats. Of course I added a few adhesive pearls and some butterflies punched with MS punches for embellishement. I haven't finished the inside because I'm not sure of the occasion. Wedding or anniversary, perhaps? Well, there are lots more fabulous gate fold cards at The Cuttlebug Spot so why not check them out and have a go yourself?

Wednesday, February 9, 2011

Bah!Humbug! Buttons and Bows Challenge


Okay, so they can't all be winners. This embarrassingly simple card is for this week's Bah! Humbug! Buttons and Bows Challenge. My first thought was "Country Christmas" so I dragged out the DCWV Homemade Christmas Stack. The green and kraft gingham made me think of a wreath and I was too lazy to cut one with my Cricut. I pulled out my Scalloped Circle and Inverted Scalloped Circle Nesties, taped them to the cardstock and cut the wreath in one fell swoop. Chose one larger and one smaller and repeated for the shadow. So simple I will definitely be doing that again! Took an hour to decide on the background DP (not really, but it felt like it) and ran it through my Distrezz-it-All to chew up the edges a bit. Cut the sentiment from ribbon from M's, glued on the buttons and bow and called it DONE! Not awful, but coulda done better. Sorry ladies, I've got stuff to do today but didn't want to miss a challenge.

Tuesday, November 9, 2010

At the Table with The Cuttlebug Spot


Last week you were invited, this week we sit at the table with The Cuttlebug Spot. The team has some up with place cards, napkin rings and table decorations sure to inspire I've finally gotten the hang of my Heartfelt Creations stamps and Nestie combos to bring you a decorated candle (battery operated so no chance of fire) and matching place cards.

I've used the Aztec Gold Sunflowers Set 1 & 2, along with the coordinating Blossom 2 Nesties. These stamps are a limited edition, only available through 12/31/10 so if you love sunflowers, grab them while you can. I stamped, cut the layers in my Cuttlebug, inked and then ran the large flowers through my Cuttlebug again with the Swiss Dots folder for more texture. The matte copper and gold leaves are from the Cuttlebug Maple Leaf 3 x 3 combo. I've added the embellies to a burlap band with some raffia ties.

The matching place card is cut with the largest of the Nesties Labels Twelve die folded in half. It was embossed With the Sizzix Tim Holtz Burlap folder and inked. The small sunflower was embossed with the dotted folder from the Butterfly 3 x 3 Combo because of the smaller scale and the leaves are punched (not sure of the brand) and the veins are scored using my Martha Stewart Score board. The initial is cut with the Cuttlebug Curls and Swirls Alphabet. The team has come up with beautiful creations this week so stop by The Cuttlebug Spot and be sure to play along for a gift certificate to The Craft Barn.

Monday, September 13, 2010

BBTB2 Crayon Box Challenge


This week Regina, our dear BBTB2 DT sister, founder of the original BBTB and owner of the fabulous Cutting Cafe chose the Crayon Box from the TBBM cartridge. I love this cut and often use it for envies for my fat Cricut cards. Actually I use it so often that I had a bit of a brain freeze. In a way I feel like I've cheated a bit because the box is the only Cricut on this project. As I've said before, I'm trying to actually USE some of my new crafty purchases (as well as old stash) so that's how this came about. The box was cut at 9" which is the largest you can cut it on a 12" mat.
At the Santa Clara Scrap Expo I purchased a number of the Heartfelt Creations stamp sets that coordinate with Spellbinder's Nesties. This was a first attempt and I must say they take a bit of practice to line up, even using the template method as recommended. I'm not gonna tell you how many got tossed in the bin. I used both the Aztec Gold Sunflowers sets 1 and 2 which coordinate with the Nesties Blossom 2. They were embossed with Tim Holtz Vintage Photo Distress embossing powder and inked with Scattered Straw, Wild Honey, Spiced Marmalade, and Brushed Corduroy (does that scream "Fall" or what?) The gorgeous corners are from the Heartfelt Creations Perfect Petals Die Cut by Spellbinders. The seeds are hand cut and the sentiment was cut with Nesties Labels Four (both on the Sunflowers 1 set).
The DP is K&Co Wild Saffron and so are the layered sticker leaves, tiny lady bug and dragonfly. The gorgeous Offray ribbon from my LSS inspired me to attach it to the box but leave it loose near the flap for a tie closure. My DT sisters knocked this one out of the park with tons of creative inspiration so be sure to check out BBTB2 if you haven't already. I hope you're inspired enough to try your own.

Wednesday, May 5, 2010

Bah!Humbug! Snowflake Challenge


Wow, wasn't sure this one was gonna happen. You'd think the Bah! Humbug! Snowflakes challenge would be an easy one but I wanted to do something different. I was having a bit of a mojo issue and then finally decided I would try that swing card again; you know, the one I screwed up on even though followed Connie's tut on the Sweet Pea Stamps blog. I was determined to get it right this time. I used SEI Wintersong papers and the snowflakes down the side were cut with my Cricut using the Doodlecharms snowflake border feature. The center snowflake is a Spellbinders Shapeabilities die cut in my Cuttlebug.
The only real embellishments are the silver adhesive beads. The inside sentiment is as peelie from Stampendous. The whole thing has sort of a modern feel, but I kind of like it.

Saturday, May 1, 2010

Sweet Little Girls from Peggy Loves Vintage and Sale at The Cutting Cafe


WooHoo! Peggy will soon be adding a number of new Cut-Outs to her Vintage Collection at Peggy Loves Vintage and here's a sneak peek. These are perfect for those of us who want more immediate gratification; 6 fun images per sheet in a variety of different subjects. This darling little girl in the apple tree is from Sweet Little Girls 4 which will available soon at Peggy Loves Vintage. I saw this cute swing card on The Sweet Pea Stamps Blog and followed Connie's tutorial. So much fun!
I printed the little girl twice and cut her out with my circle Nesties so that when you opened the card she was still visible in the tree. OOPS! I JUST REALIZED IF I HAD DONE THIS CARD CORRECTLY I WOULD HAVE CUT THE HALF CIRCLE OUT OF THE MIDDLE HALF OF THE CARD AND I WOULDN'T HAVE HAD TO PRINT TWO IMAGES. GUESS I DIDN'T FOLLOW THE TUT TOO WELL AFTER ALL. (In my defense, I was in a hurry because are having a WINE festival in town and I surely didn't want to miss an of THAT, LOL) The front and middle panels are embossed with the Leafy Tree folder from Crafts Too, available at Custom Crops, and cut in half with the Nestie scalloped circle used for the swing part cut out.
When the card is fully opened it reveals the computer generated sentiment. I got the little apple charm on clearance a Michael's awhile back, (there were 2 on a card that were originallly $19.99 and were reduced to I think a buck) and it has a lobster claw clip so it can be unhooked to put on a bracelet if desired. Be sure to check out Peggy Loves Vintage Blog to preview the great new stuff that will be available SOON!
Also, there is still time left for the fabulous 2 for 1 special at The Cutting Cafe in honor of National Scrapbooking Day. Regina has added tons of fabulous new templates, background stamps, sentiments and more. Hurry though, it ends tonight (May 1) at midnight PDT.

Wednesday, April 28, 2010

Bah! Humbug! Pretty in Pink


Well I have to say this week's Bah! Humbug! challenge through me for a loop. The challenge is "Pretty in Pink" and I thought "oh, won't that be fun?" until I started looking for paper. I did have a few DP's that fit the bill, but they didn't coordinate with any other pinks I had so I finally gave up and decided to try something new. I'd never cut my Poinsettia Frameabilities so I cut and embossed 2 parts of the frame and airbrushed with my Copics (much to my DH's delight since he bought me the system and really nice air compressor for Christmas and I haven't used it much...yet.) I matted it in silver foil card stock and added some silver adhesive beads, ribbon, and metallic sentiment sticker. My only problem is it doesn't really look like a Christmas card to me. Oh well, it's too late in the game to start over.

Tuesday, April 27, 2010

The Cuttlebug Spot Favorite Flower (and Happy Birthday to ME!)


This week at The Cuttlebug Spot we're celebrating our favorite flowers. I have so many, it was hard to choose, but seeing that it's Spring and I had an Impressabilites embossing (what do you call 'em, stencils?) from my dear friend Glenda (Thanks hon!) along with a tulip Borderabilities (also from Glenda) I hadn't used I thought "Tulips it is!"

I wasn't quite sure what to do with these thin metal filigree plates so I bopped over to Susie B's Heartprints Gallery (Shes by far the embossing QUEEN!) to see how to use them in the Cuttlebug. She had all sorts of recommendations as to paper and whatnot, but I just followed her Cuttlebug sandwich guide of A Plate, B Plate, Spellbinders tan embossing mat (you really do need the thin squishy mat for this, plumber's gasket is too hard) , paper, Impressabilitie, and B Plate. You'll also need some shims to get a deeper emboss. I used 2 of the cardboards that come with my Cuttlebug Folders. As for card stock, I just used the inexpensive Wausau stuff you get a WalMart.

I really love how this turned out, especially after chalking. It doesn't photograph as well as it looks IRL. I decided to keep it simple and do a monogram card using the Borderabilitie across, and labels 9 as a base for the "D" that I cut on my Cricut from Lyrical Letters Loop Dee Loo font. The small tulip I added is from the Spellbinders Tulip Pendant. I really think it turned out soft and pretty and I'm sure I'll be making more of these. Be sure to stop by The Cuttlebug Spot Garden to see al of the beautiful creations by my DT sisters. And please play along for a chance to win a $50 (WooHoo!) gift voucher from Simon Says Stamp! But remember, you need to submit a "new" card and it must have some type of dry embossing. I'm a bit bummed today, because after several days of fabulous weather, it's dreary and rainy and it's my birthday. At the moment the old "April showers bring May flowers doesn't cut it with me. LOL At least dinner at Boulevard in San Francisco will cheer me up! YUM!


Friday, April 16, 2010

Oh Alice! Flowers and Stampotique "Girly Card" Challenges


This week at Oh Alice! we're learning alot from flowers. I've been dying to make some of these layered flowers and thought it would be the perfect time. (Especially since I wanted to use my "creepy" LOL baby face stamp for the centers.) I used 2 sizes of the Blossom Nesties with tissue paper and colored the edges with Copics. Because the faces stamped in black looked a bit harsh, I adhered a single layer of tissue (cut with an even smaller blossom) over the stamped image by running it through my Xyron right side down. It just so happens that Oh Alice! is being sponsored by Stampotique (one of my FAVE places to shop for stamps) this week and their Designer's challenge is to create a "girly card". I usually prefer to use Stampotique stamps when doing their challenges (even when we don't have to like this week) but I thought this looked pretty "girly" with the fluffy flowers and all so I'm entering it there too.
I was having a discussion with my friend Smita this morning (by email since she lives in India)about MS border punches so I had mine out to test them and actually ended up punching out 2 sides of the card stock without screwing up so I folded it to make the card base. WooHoo! I considered using another color for the embossing behind the flowers (Cuttlebug Leafy Branches) but decided I preferred the pristine white look. The sentiment is an "Alice" quote done on the computer and cut out with my Nesties Labels 9. I really enjoy doing challenges that allow me to explore different styles and techniques so I hope you think these are as much fun as I do.