Showing posts with label CARDS. Show all posts

Tuesday, October 25, 2011

MY PINK STAMPER DESIGN TEAM MONTHLY PROJECT

 another month flew by and here we are sharing with you another monthly project using the awesome stamps from my pink stamper. i am using "winter treats & sayings" stamps set.

i will now introduce you to
 mr.g
---mr. gingerbread that is---
card is standard a2 size
4.25" x 5.5"
isn't mr. g so handsome and yummy at the same time?---;)
 
my pink stamper ---aka robyn--- has released some many different stamp sets with some many different themes you really won't need anything else in your stash ;P. this one i used---winter treats & sayings--is full of great sentiments/phrases for winter and/or the christmas holidays ahead of us. 
 
look how beautiful these fonts are too. love them!
"WARM WINTER WISHES AND GINGERBREAD KISSES"
how cool is that?
the base for the sentiment is a piece of chipboard i covered with patterned paper and distressed a bit. two tiny copper brads were added to each side.

i found mr. gingerbread hiding in an older cartridge. i found him in stretch your imagination. i only used the blackout feature at 2.40" to properly fit him on front of the sack of flour look alike, lol. i used joys of the season for that one...it is actually a frame.
the big romantic? eyes are a rub-on from sizzix i had like forever and never used them before. they were so very nice and easy to transfer despite being in my stash for a few years now, :D


so what do you think about mr. g? 
you just can't help but to love him at first sight, right? lol ---what about the sentiment?-- i say they were made for each other, hehe

i want to invite you stop at robyn's aka my pink stamper and see the whole post and enjoy the work of my team mates. 
this is my pink stamper link and clicking it will take you to her site.
it is highly recommended because i assure you do not want to miss any of it.

now, 
i want to thank you for stopping by my blog. 
i certainly hope i have inspired you with this my pink stamper monthly design team monthly project:
mr. gingerbread


Monday, October 17, 2011

EEEEK!- A BITTEN BY THE BUG CHALLENGE


i just came back from boston last night. we went to see our son. he is loving it and he proudly showed us the neighborhood what he is calling home now :(
this post is late because i did not have the energy to work on it last night.
my apologies to the BBTB2 team for my delay and to you too for my tardiness.
this week we are working with hello kitty greetings and we are using image #43 on the overlay and page #70 on the handbook.

---this is my take on the challenge---

EEEEK!
5.75"
sweet kitty....she is always so cute.
this is a great cart!

 the orange background was cut using cindy loo
it turned out gorgeous!
kitty was cut at 2.25 and the only cuts i used were the base and layer one for the face--no shift.

the bats are the negatives of a paper punch by martha stewart. 
i layered them 4 times and then stickled them---(stickles=glitter glue)

the EEEEK! is from a my pink stamper set called spooky puns---a last year's release.
you can find it here---it has so many cute sentiments :) and where i stamped is the paper punch where i got the bats from, :D

 and this is my kitty...she is too cute to spook. :P another sentiment from the spooky puns set but i already had cut the border and did not fit :(

join us in this challenge picked by my dear theresa---BBTB DT sister!
 a great image to work with. if you do not have Hello Kitty Greetings, you can always use any other similar image for the challenge....NO EXCUSES! ------LOL.


NOTE: a reminder that if you want to be enter in my vulture (last weeks challenge) you have to let me know. i haven't received any entries. 
you still have one more week to join the vulture challenge at BBTB2. 

click HERE, to join us.
 
a HUGE thank you for stopping by,
love you all.


Thursday, August 18, 2011

JUST ADD WATER...


in my To Do List i have a few Thank You cards i have to make but i haven't have time. my days haven't been too sunny lately but i am trying a new medicine starting today and i am hoping it works better or at least lasts longer.
anyhow, i made one of those thank you cards today, and it is going overseas.
 
Just Add Water...
4" x 6"
i do not know why i am liking the thickness on the cuts lately, but i cut 4 layers of the white cardstock for this card. it is a 110lbs. cardstock so it is not flimsy at all. i am just liking the look right now, maybe i change my likes next month, lol.
the stamp is from My Pink Stamper latest release and is called: Yummy-licious. well, flowers are yummy-licious too and i decided to use one of those stamps from my image.

the cut is from Everyday Pop Up Cards (cricut cartridge of course), image #3 on the overlay and page #23 on the handbook. i cut all its layers too.

a close-up of the flower. loving the texture on that paper.

this is another sentiment from the yummy-licious set and i stamped it on the inside.


 i used the Font-abulous set for the shipping envelope
----the bad stamping was my fault, not the stamps fault, i was in a hurry :(----


well, one card to go....many more to make :P

remember you can click on the pics for zooming and you can click on any of the links to go to My Pink Stamper site---even this one,  :)


Big Hugs to all!

Friday, August 5, 2011

BITTEN BY THE BUG 2 DESIGN TEAM


 (click on this link to see what the rest of the team has made and to participate in the challenge)

***

hello my friends...hope all is well with you all.

you read the title right.....i am in a new design team:
Bitten by the Bug 2

i am so excited that Heather invited me to be in their design team. i have been lurking and stalking this site since Regina used to run the first one. i invite you to be part of it and enjoy all the work that these talented ladies have to offer and to participate in the challenges too. this is a new adventure for me and for you too and i am ready to start.

we were asked to work with the  
Locker Talk
  cartridge and use any school supply image for our project.

I am very happy to present my first project for the fabulous design team of BBTB2...

*_*
Science Notes


 i first made the pencil from page #37 image 6 . i decided not to use the card feature and using my gypsy i welded two of the "pencil cuts" using the shadow creative feature. i also cut a blackout cut from the rest of the layers, which i covered then with pattern papers, to give my card more definition and more substance in real life. the word "notes" was done using the "all mixed up" cartridge. the red brad look alike is a red button i had in my vintage button box. i also inked every layer but the black ones ;p.
i then was thinking the pencil looked very lonely and i made a book to take "notes" from--lol.


 this "book" is on page #47 and the "science" word you find on page #63---using shift and the "phrase/layers" feature.
the goofy face was done using bits and pieces of scraps.


and here you have it again.

i hope it inspires you to start using some of these older cartridges. while looking through the handbook i was amazed at how much this cart has to offer.

i want to Thank Heather publicly, the owner of the BBTB2, for giving me the opportunity to be part of their team and for believing i am up to the task :)
 and to Lori who picked the theme for this challenge i had so much fun making my project.

i think all is good here and i hope you feel the same way. if you have the time, please go and visit this wonderful blog and wonderful design team.
you will be drooling over all the projects there and filling up your head with so many ideas---that is what happens to me anyways, lol
love you all!!!

****************

and soon i will have some "sneak peaks" of the new clear stamp sets releases from

sooooooooooooo...stay tuned! --------hehe

and thanks for stopping by---!!!!

Monday, July 18, 2011

CHRISTMAS IN JULY DAY ONE

this is the slider card i made for the
CHRISTMAS IN JULY EVENT 
at

Ho Ho Ho
6" x 3"
 Supplies:

Cricut Cartridges
---Just Because cards: card base, sun
---Very Merry Tags: Santa's Face (charm)
---George and Basic Shapes: rectangles and oval for the slider
---Christmas Cheers: tree

DCWV for the patterned papers:
Holiday Collection and The homemade Christmas Stack

Doodlebug Designs:
white flock

American Crafts:
foam adhesive

this is my first time making a slider but i am very satisfied how it turned out.
 i hope you like it too.

on wednesday July 20th i have another project to share for the 
Christmas in July Event.

Thanks for stopping by and all your love!!! 

******
 

NOTE: I will be announcing the winner of the BFF-Inspirations of the Heart blog hop
see you then my blogger friends.
*_*


Monday, May 2, 2011

HAPPY MOTHER'S DAY


it has been a while since i posted something but i still around. in my country there is this saying: weeds never die, hehe. that's me!

Happy Mother's Day
5.5" by 3.75"
anyway, i had no idea of what i was doing here, lol, but i knew i wanted to use at least once, the kate's abcs cart.
the mushrooms you will find on page 57----cut them at 3.25".  
the butterfly is from the same page and was cut at one inch.

this frame is from sizzix and the awesome greeting is from mps
i love this font.

oh! the dry embossing was done with the script texture folder from cuttlebug.

a bit of inking, a bit of bling.
 
something a bit different but not bad at all :P. 

I hope you guys are doing well.
 
-----
remember, this saturday is national scrapbooking day (NSD) and robyn will be celebrating with ideas, challenges, giveaways and new stamp releases. mark your calendars so you do not miss all the fun. 
i really enjoy participating in the different challenges and  hope you do too.

love you all!
*_*


Tuesday, March 15, 2011

ALL TIED UP-THE CUTTLEBUG SPOT WEEKLY CHALLENGE

 hello there...hope you all are doing wonderful.
we started receiving school acceptances from my son and i can't wait to see where he decides to go. so far we have received 2 out of 6. one of them already told about how much aid he will be getting. i do not want to jinx anything so i will wait to tell until we have a final decision.
BUT, i do have to add my son was awarded with the "Student of the Year" and he got another award for "Altruism". remember he was awarded with the student of the month and we went for a dinner on his honor? we have another dinner to go, i just do not have the date yet. :)
anyhow, Congrats to my son who well deserves it. he works very hard at what he does. he puts his life and soul into it everything he does. we are so very happy and proud of him. 
let's wish him well on all his endevours.
thanks-!!

well, today is tuesday, march 15 and our term with the cuttlebug spot is coming to an end at the end of the month. But in the meantime, let's continue enjoying the process.
this week we have:
twine or string... any kind like cotton or hemp to work with.
i did not have any twine or hemp avail so i used some bits of raffia i had left over and tried to incorporate it onto my design. talking about my design...my design was a scraplift this time. i saw it at paper crafts magazine and decided to use it. 
below is the photo of my inspiration
and i wish i did a better job, but i guess i was still in a rut even when inspired by a beautiful card like this one.

Happy Easter 
4.25" tall by 3.25" wide
i used "a child's year" for the card base: image#19 (using the hide contour for the star).
the card base is a teal color from bazzill and the patterned papers are from making memories vintage findings collection--bought at michael's for $1.39 (48/8x8 sheets) excellent buy. that was a while-while ago :(

you can see the raffia here. it is supposed to represent an egg nest.:( the eggs are from the same cart (acy) image#6 using shift and the icon feature. they were cut at one inch. the spots you see on them were done with a versamark watermark ink using one of my pink stamper stamps first releases called 
"simply sweet occasions". the eggs were also embossed using my the cuttlebug "swiss dots" embossing folder. the "happy easter" greeting is also from my pink stamper . this one is from the "happiest moments" collection.
the golden dots were made using a dimensional fabric paint in a light bronze color.

and this is the inside of the card. 

i do not know if you have been playing along with us at the cuttlebug spot but if you haven't...stretch yourself out and join us in the weekly challenge.:P
we will have two more challenges and we will be done at the end of march, and most of the time nilda has some kind of giveaway for a lucky participant. 

click here to see what my other team mates have made for this challenge, get inspired and have some fun with us. good luck on your entry.

remember this is for fun...

love you all--!!
*-*

Tuesday, March 8, 2011

GET CHARMED


this week we have to use charms on our projects.
 and of course, my project is a card--wink.


Birdhouse
7" tall x 4-3/8" wide
i couldn't capture the colors very well on some photos :(
i used cindy loo for the birdhouse: image# 40 and i used all its layers. the size is 4.75 inch tall.

 it is hard to see but there is a butterfly charm by the spanish moss.

i paper pierced around the birdhouse and stickles was added to the heart and to the yellow ornament below.

the birds were punched from a fiskars punch--- three times on different papers--- and layered with adhesive foam for dimension.

the "grass" was done with another fiskars punch and embossed with a new tim holtz sizzix embossing folder called "cracked" using my cuttlebug.

the pretty patterned paper is from k&co. i also used kraft cardstock for the card base and american crafts on the solid colors.

come and play with us this week and  
"get charmed" 
at the cuttlebug spot. have some fun with us. it is nice to participate in challenges plus you never know if you will win some candy. ;)

--------
remember, this friday we will have our monthly 
and i have some candy for a lucky participant.
--------

love you all 

*-*

Saturday, March 5, 2011

TRAVEL MINI CARDS SET

hello to all

i have to tell you guys why i am not around much anymore. since i added the gym to my almost daily routines (and that along takes a lot out of me) i am finding less time to blog. i am fine but i want you all to know it will be like this for a while. sometimes more blogging sometimes less. 
i also have been getting the house in order for spring, doing lots of laundry, taking care of personal things and doctors appointments. 
talking about doctors appointments---my son will be having his wisdom teeth removed sometime in summer. the surgeon was a young doctor and he was very pleasant. it is always nice feeling comfortable with the doctor. it means a lot.
i am also working on a mini album (mostly on-cricut) and i haven't make a mini in a while :(. i want to put it up for sale on etsy and trying to keep my shop going. the extra tiny income will be very well needed when my son starts college since i guess i will be money-less then, lol. so...i said to myself--agnes, better start trying to get some extra cash and the only way you can do it is trying to sell your handmade stuff --. hehe
let's see how it goes. wish me luck. etsy is getting like ebay---very busy and your listing gets buried among other listings very-very fast. i am trying to stay afloat there.

anyway, 
this is something i listed on my shop a few days ago. i made it mostly with kraft cardstock which seems i am in love with for a while now ;p

Travel Mini Card Set
bag 5 inch tall

i love how it came out. this envelope is from just because cards and i added that ticket shaped on the side and it looks so cute. that was done out of necessity to make sure the envelope wouldn't open later on and if it did it was going to be secured.
the paper used is from "me and my big ideas".

below is a collage of pics from the set.
 all vintage looking like me but i hope you still like it--hehe
hey, an inspiration is an inspiration, right?
wink-wink

love you all!
*-*


Tuesday, March 1, 2011

HAT PINS GALORE WITH THE CUTTLEBUG SPOT WEEKLY CHALLENGE

 hello my friends,
between the gym and household chores is a miracle i still alive, lol
 today is a sunny day here in my neighborhood and that should recharge my batteries for a bit.

i am also taking my son to an oral surgeon for a consultation/scheduling on his wisdom wisdom teeth surgery. the bottom ones are sideways and of course they need to be removed. i never had my wisdom teeth so maybe that is why i still a goof--hehe

Ouch! :  Hat pins
this is my take,
Always Laugh
4.25h by 5.5w 
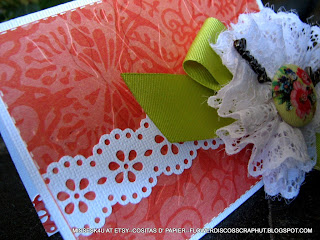
this flower is huge...flowerdisco went crazy this time--hehe

thanks to the spender in me, i bought these hat pins at J's because they were on clearance and i said to myself we never know when we are going to need them, ;p. 
here is a pic of them:
they have different sentiments and i love the font and material used for them, don't you?

anyhow, i looked in my ribbon box and i saw this kind of wide cheap lace :( and i decided to make a flower.
it came out huge, lol, but nonetheless i was decided to use it on my card--go figure.

the fabric button is another clearance find from k&co.

and the paper lace we all know it from the martha stewart collection of punches. i also used it in the inside.

sorry about the "glub" of glue on the white square piece of cardstock. i did not realize it until now. i will take care of it with my x-acto knife later on.

you can see the flower wasn't really attached to the card--wink!!!!
my son still thinks i am a goof, especially when i come to him with these atrocious ideas, lol.
the little white square is very useful as you will see below.

you can see the embossed patterned paper, right? i had to have my embossing in. after all is for the cuttlebug spot :)
 aha!!!!!!!! yeah, you are seeing right ;p. i put another hair pin (a real one) on the back of the ribbon that was glued to the lace flower that was pinned to the white little square--hehe.

now, you can remove the flower and use it as a real hat pin, hair pin, brooch, put it anywhere you want 
....voila!!!!!
that was my genius and or atrocious idea for today. lmbo

so what do you think? hehe...flowerdisco just lost it!!!!!!!!!!

i bet you can do better with some kind of those glubbers  that are so popular right now. 
but you get the idea here first,.
right? right.

play along with us at 
and also enjoy yourself looking at what my team mates have prepare for this week of 
Ouch! Hat Pins
love you all!
*_*

Wednesday, February 23, 2011

POP-UP CARDS CHALLENGE AT THE CUTTLEBUG SPOT


i started going back to the gym on monday, president's day, after been out for a month. it was not as bad as i thought it would be. wish me luck in staying put, lol.

i did not post yesterday the cuttlebug spot challenge post since i had the my pink stamper february design team project. 
this week's is a pop-up card challenge and after looking around the web for ideas, i decided to make what they called a 

Free Standing Pop-Up
5.5 inch tall when closed
you can find the instructions on how to make this beauty 
it will be better than me trying to explain it, lol.
i bet you will be happy to i sent you there.

 the paper is from dcwv, mi casa collection. such a pretty paper/cardstock.

the sentiment is a clear stamp from a my pink stamper stamps collection called

Faithful Sayings

the butterflies are really pretty. they cost me a dollar for a lot of them but can't remember where i got them :(

the corners were done with a fiskars corner punch, the ones that you twist. isn't that font on the sentiment gorgeous? and the sentiment itself? love it. all we can do is trust in the Lord. that is what i do anyway. :)

my other team mates have their projects up and nilda has them all together HERE for you to get inspired and play along in this weeks challenge.

go and have some fun. 
nilda also has a link up where you can find more tutorials for other types of pop-up cards. 
fun to make. 
love the interaction of these cards.

hugs to all of you!
*_*